Generating Fake K-pop Faces Part 1
Posted on 2019-02-11 in AI art
·5 min read
This project is for my own personal fun and learning. Hopefully it’ll be fun for some to read about my progress as well.
 My first (poor) attempt to generate faces. Read on to see how I did this.
Planned approach
I expect this project to have maybe 7 steps. I’ve done steps 1 and 2.
- gather, filter, and normalize training data (images)
- generate female K-pop faces using a simple autoencoder (neural network)
- generate female K-pop faces using a variational autoencoder (VAE)
- generate female K-pop faces using a vanilla generative adversarial network (GAN)
- generate female K-pop faces using a fancier GAN architecture
- switch to using cloud GPUs instead of my Macbook (if I haven’t already) for better results; tune hyperparameters etc. a bit more
- try expanding to J-pop faces and/or male faces? (thanks to Daisuke Ishii of Team AI for the suggestion)
Step 1: gather, filter, and normalize images
This was actually a bit tricky, and I wanted to do it without any manual human filtering (because 1. it was a fun technical challenge for myself and 2. I wanted the process to be easily scalable to more images or other categories of people)
Downloading images
It was surprisingly easy to crawl/scrape images from Google, Bing, and Baidu image search given the Python package icrawler. Here is a code snippet showing how easy this is.
keywords = \['걸그룹 프로필 사진', '걸그룹 셀카'\] # e.g. "girl group profile pic"**for** keyword **in** keywords:
    google\_crawler.crawl(keyword=keyword, max\_num=300, min\_size=(300,300), file\_idx\_offset='auto')
    bing\_crawler.crawl(keyword=keyword, max\_num=100, min\_size=(300,300), file\_idx\_offset='auto')
(full code here)
I used multiple search engines and keyword phrases in different languages both to get more input data (images) and provide more variety in the input data (variety deriving both from algorithmic differences and cultural differences, i.e. Chinese journalists might depict K-pop a bit differently). Another reason for using Chinese keywords for Baidu image search: it seems that Baidu tends to do a poor job of providing relevant search results when searching in other languages.
Normalize/preprocess images
I won’t get into the details, but normalization involved mainly:
- object localization and cropping (i.e. find the bounding box for a face in an image and crop to that box; sometimes this involved outputs of multiple face images per raw input image, since multiple people can be in one input image)
- resizing
- alignment (sometimes a face is tilted diagonally; I rotated the face so that eyes are perfectly horizontal)
I did all of the above by adapting existing code snippets and using the OpenCV, Keras, and [imutils](https://github.com/jrosebr1/imutils) packages.
Filter images
For the time being, I wanted to ensure that the input data includes only female faces, not male. Since gender classification is already a common ML task, I thought I would re-use an existing model. In fact, I ended up using TWO existing models (1, 2) with different neural network architectures and only let images through if both models classified them as “female” above a certain probability threshold.
One might point out that if I just re-use an existing gender classification model without understanding it, I might be unknowingly introducing bias. For example, if the model had been trained mainly on caucasian faces, then the model might only be able to output high probabilities of “female” when the face looked somewhat similar to a caucasian face (and the model might be less certain otherwise). Well, that’s OK for now, because 1. I’m just having fun here and 2. the result seemed to be a good representation of female K-pop faces (in terms of my own qualitative judgement).
A further side benefit of using this gender classification filter is that, for images that are somehow weird or failed to be normalized properly (e.g. the the person is making a funny face or the picture is actually of an animal not a human), the gender classifier will tend to be uncertain about the gender classification, and hence such images would get filtered out by this filter.
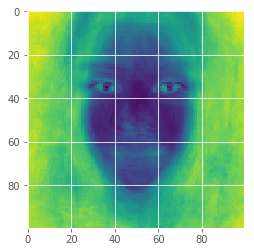
After normalization and filtering, the average image looked like the below. I was pleasantly surprised at how well the position of eyes matched across images. (In contrast, when I took the average of input images for another project years ago, the result was just a meaningless gray blob.) Seems like I did an OK job of normalizing and filtering :)
 The average input image
Also, to more specifically visualize the variation across images (darker = less variation):
 Color = the mean across color channels of the standard deviation across images for each pixel
Also, here’s a montage of a random subset of the input images (after normalization/filtering):
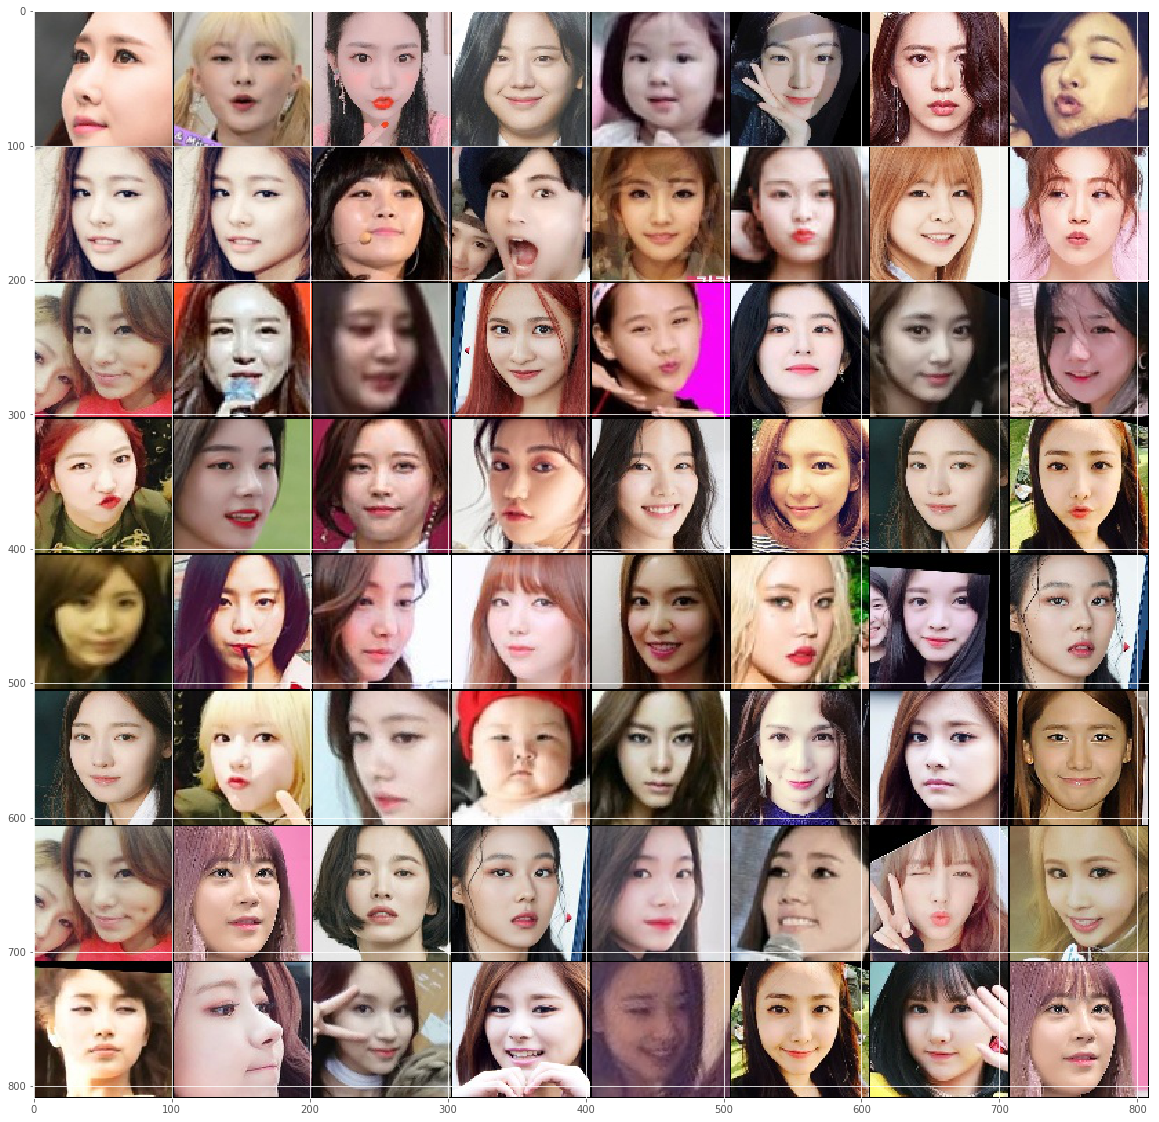 I’m sorry if this violates copyrights
Step 2: train and use a simple autoencoder
The autoencoder architecture I used was simple and conceptually similar to the below. Each column, a vector of values, is a layer in the neural network. We train the autoencoder by trying to make it produce an output image that is similar to each input image, which forces the “bottleneck” (middle layer) to capture the essence of the image in a very small vector of numbers.
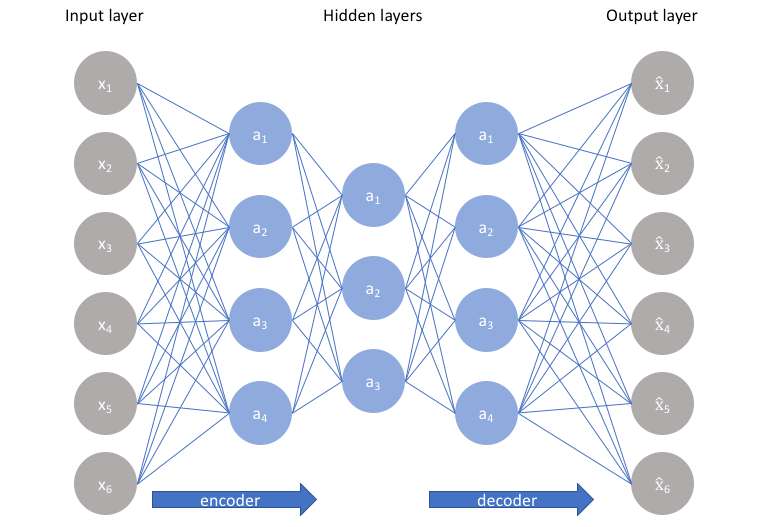 Image stolen from jeremyjordan.me
For now, I used only a vector of 2 values (elements) as the bottleneck in the middle. It turned out that, without any intentional design on my part, these 2 values ended up representing hair color and horizontal face rotation, respectively (or something close to that). I think a casual human observer would also qualitatively comment that these 2 factors (hair color and face rotation) are the primary cause of variance between images, so it’s cool that the neural network discovered the same factors automagically. This is one big use case for autoencoders (and some other ML algorithms) in general: you can boil down complex information to its essence, which can be represented simply.
The animation at the top of this post combines the results from varying the 2 values in the bottleneck vector between -1 and 1 and then applying the decoder to those values.
Code
The code is not super clean, but here it is.
A good part of the code was borrowed from session 3 of the class Creative Applications of Deep Learning Using Tensorflow on the e-learning platform Kadenze. It’s a great class, but it might be a bit out of date.
See you next time!
Please stay tuned for part 2 =D Hopefully I’ll be able to generate more realistic images next time.